Marvelous: Mou Hitotsu no Takarajima (Super Famicom)
Walkthrough for all 5 chapters
From camp to escape by balloon, follow essential items and shared tasks in order. Puzzles whose precise inputs have not been cross-checked are listed in the verification notes at the end.
Scope: Japanese Super Famicom version (released October 26, 1996) / Content checked: October 2, 2026
Chapter 1, camp: Goggles and fishing equipment
- Gather firewood for the campfire and help the child in the water. Use Search to pull the child up in time with the counting signal, then receive Max's Goggles.
- Visit Ms. Gina's tent before going to see the ship. Trap the mouse between different boys from inside and outside to retrieve the teacher's Scarf. Check Gariben's chest puzzle first too.
- Equip Max with the Goggles and retrieve the Soccer Shoes from the pond. In Jim's penalty kicks, place the other 2 boys in different directions to distract him, then kick as Max.
- Speak to Jim as Jack to receive the Fishhook. Use all 3 boys' teamwork at the pond to obtain the Fishing Rod, and catch a fish in advance.
- Line up all 3 boys and use teamwork to move the rock and the pot in the cave. Deliver the firewood to Dorothy, then follow the guiding monkey to the ship.
Chapter 1, ship: the 1286 shutter and colored keys
- Place all 3 boys around the wooden crate and cooperate to rescue Winkii. Receive the red, green and blue keys, then have each boy open the chest matching his own color.
- Convert the animal clues on the wall into numbers and enter 1286 in the shutter device. Do not confuse it with another number device; check the passage that opens.
- Turn the ship's gears with teamwork and put 10 Luck Rocks into the boiler. Collect the Dash Shoes, Jump Boots and Small Key before leaving the ship.
- Use Max's Small Key at the western wall. Turn the handle that appears right 2, left 5, then right 4, and proceed through the opened route.
Chapter 1: robot and the first crystal
- Use Jack's Jump Boots to cross the platforms marked with footprints. Use the Fishing Rod at the fish's mouth to reach across, then go for the robot Controller.
- Reunite with your companions and control the robot as Jack to break the crates in the way. Check who you are controlling instead of assuming the boys' attacks and robot movement use the same controls.
- For the high switch, make Max leader and stack all 3 boys. Examine the second device from the right in the row and collect the Crystal Ball.
- After the teacher is kidnapped, catch the fish carrying the Chain Key with Jack's Fishing Rod. Rescue Jim, then take the jumping route with Jack alone.
Chapter 1: rescue from the hole and Polly
- Check the Rope where Jack fell. Use the Transceiver to switch to the 2 boys elsewhere, then cooperate to move the rock and open a route for Jack to return.
- Fill the quicksand hole by dropping in a rock. Separate the boys carrying the rock from the one crossing, rather than trying to solve it with jump distance alone.
- After obtaining Dion's Mitt and Ball, hit the monkey with the Ball to expose its disguise. Use the Ball with the dog too, then examine the tree base and tracks to find Polly.
- Have Polly accompany Max and operate the watering robot as Jack. Deliver water to the seed to grow a leaf bridge and continue. Make precise directional inputs in short steps while watching the robot's position.
Chapter 1: minecart and departure
- Solve the puzzle where Dion is captured and collect the Hammer. Use it on the stakes, then push the pipe from the right with all 3 boys to open the route.
- In the minecart section, use Dion's Ball to stop the Patchies and switch the rails. Follow the route taken by the cart carrying tomatoes as a landmark.
- Use Dion's dash to cross to the log, with the other 2 boys handling the floor switches. Cooperate to carry the log with Dion at the front.
- Identify the wall with red paint and dash through it to reach the exit. Do not keep examining only the misleading entrance before it.
- Use Polly at the ship's large keyhole, then cooperate to operate the lever and crystal pedestal. Before leaving, return to camp to look for additional Luck Rocks.
Chapter 2, wilderness: photograph and mansion key
- Get dog food from the sheriff and put it in the bulldog's dish. Kick the flower's root as Max, then use Dion's Ball on the opened flower to make a path.
- On the route with holes, send Jack ahead to move the rock. After touching a scorpion, do not immediately approach again; retreat somewhere you will not involve another boy.
- Receive flowers in Cisco and use them on the crow at Benson's grave. Move the grave with all 3 boys to take the Photograph, then show it to townspeople to hear about the clock mansion.
- At the old woman's house, cooperate with Max on top to wipe the window. Carry a plank to the hole in the floor and fasten it with Dion's Hammer.
- Pull the table from the left into the middle, then circle to its right side and push. Finish cleaning to receive the Mansion Key, then go to Benson's house.
Chapter 2, past: clocks and water source
- Choose a clock whose hands do not break. Move them from 10:00 to 9:30, then 10:30 to advance the event. Examine the purple clock to travel to the past.
- For the house under construction, choose plan 2, which has an entrance. This choice provides the entrance used when searching for Benson in the future.
- At the sheriff's house, listen through the window. Match the blue penguin's movement with the pink penguin, then have the remaining penguin show you where to dig for water.
- Receive the Blueprint from the architect as Jack. Obtain Junk in the future town and use the Blueprint to make Max's digging machine, Mogura-kun.
- Return to the past, dig at the indicated spot and let the water through. Use Polly where the cow blocks the way. Fish a frog from the pond's lotus and use it at the sheriff's window to rescue Indio.
Chapter 2: rescuing Benson and the second orb
- In house 2 in the future, dash into the shadow as Dion to find Benson. Show him the Photograph and have him accompany you to the hidden path in the past.
- Lend the Dynamite if the passage will not open. Break through the wall near the eastern pond and return it after you finish. Operate the wall switch with Max's kick.
- Examine the telescope as Jack and enter the smoke directions right -> left -> up -> right -> up. Move the pedestal face with all 3 boys and proceed to the battle beyond.
- The cannon battle uses Luck Rocks. After helping Benson with the floor switch, defeat Manmart using Dion's Ball.
- If you want to play the past's clock minigame, do so before resolving the incident. In the future after it is resolved, the clock is gone and you cannot return to the past through the same entrance.
- Solve the future grave puzzle, then dig as Max to take the second crystal. Prepare 20 Luck Rocks for the ship, and secure the helm while sailing to survive the storm.
Chapter 3, forest: recording and gorillas
- Pass through the monkey maze to Dr. Marlow's tent. Receive a Photograph from the woman taking pictures and deliver it to the doctor. Speak to him as Jack to receive the Magnet.
- After the tug-of-war with the monkeys, cross the ledge as Jack and borrow the Tape Recorder from the researcher.
- Search the male gorilla and record its voice. Play it where the monkeys gather densely to open the passage.
- Record the female gorilla's song in the flower field over the previous recording. Play it for the male to be allowed through. After changing the recording, check its contents before returning somewhere that needs the old sound.
Chapter 3, village: telephone reservation and the real Jean
- Read the diary on the second floor of Smith's house. In the western house, carry the black plant to the X-ray machine with all 3 boys, then examine the underground plant and papers on the floor.
- Bring the doctor to the village. Dig as Max where the papers lay, then use the Piece of Board you find on the damaged sign beside the telephone.
- Call the administration office using the number restored on the sign and make a reservation. Visiting the office first does not get you through without one.
- Look through the outside wall hole at the house where you search for Jean. Make Max leader and stack the boys, identify the child who laughs last and speak to him. Receive the Key and use it on the fence farther in.
- Examine the salt water in the cave. On the grassy path, use Max's kick to check for holes as you cross. Find Smith and defeat the plant dog, then examine the tree and return to the village.
Chapter 3, parasitic plants: checking the residents
- After the rain, receive the Salt-Water Spray from the doctor as Jack and use it on the nearby plant to rescue Smith. Speak underground, then look for Mike and clues about the residents.
- Use Cheese at the mouse hole on Smith's second floor and record its squeak. Play it in the jukebox house, then speak as Max to receive a Village Coin.
- Give the Coin to Jackie and win the boxing match as Max. Receive the Punch Gloves and ask the children about their music tastes.
- Record rock music from the jukebox and play it in Jean's house. Examine the child whose rhythm differs from the others and pick up the Doll it drops.
- Show the Doll to the mother carrying a baby and accept the lunch delivery. Deliver it to the helper at Smith's house to receive an Empty Flask, then fill it in the salt-water cave.
- Try the Salt-Water Spray on the person in the office. Give them lunch and the Flask of Salt Water to expose their identity, then fight with Jack's Spray and Max's punches.
Chapter 3, underground: power generation, mouse bridge and parasitic tree
- Place Max in front of the X-ray machine and use Jack's Magnet to draw out the key in his stomach. Move it without hitting the walls and dropping it, then use it on the fence in Smith's basement.
- Use the Spray on the underground plant and continue deeper. Leave Dion dashing at the generator, then send Max ahead to punch away the plants.
- When the light weakens, switch to Dion with the Transceiver to generate power again. Operate the power switch left of the shutter, then reunite everyone.
- For the mouse bridge, hook the largest mouse first with Jack's Fishing Rod. Wait until the other mice link onto its tail, then pull them in after all are connected.
- Defeat each form of the parasitic tree and collect the third orb. Before sailing, return the Tape Recorder to its lender and meet the ship boiler's required amount. If ice strikes the ship, break the ice on deck with the Hammer.
Chapter 4, Lilliput: Ant Buster materials
- Bring out Max's Polly for the tiny person attacked by an eagle, then follow into the cave. Accept Hazan's request in the kingdom, leave Max at the castle and enter the forest as Dion and Jack.
- Check the 5 materials on the underground blackboard. The electricity at the frog pond is operated from the castle, so switch between Max and the 2 boys in the forest with the Transceiver.
- Visit the soldiers in the order directed by the soldier in the records room to gain access to the electrical switch. Lead the frog to the pond, place the 2 boys on the small island, then turn on the electricity at the castle. Receive the tail and turn the electricity off.
- Answer the pill bug's question and receive its Shed Skin. Trade it for the handyman's Doghouse, then give that to the snail to receive the Forest Shell.
- Hit the bursting orb near the bees with the Hammer when the slow bee is above the hole. Use the dropped honey as a clue to receive the Golden Drop from the person in the cave.
- Spin the bagworm with Jack's Spray and stop it with Dion's Ball to obtain the Coat. Turn the spider with the Ball, then use Jack's Fishing Rod when its rear faces you to obtain the Silver Thread.
- Give all 5 types to Hazan and bring Max back. Do not assume handing over 1 material completes the request; compare your inventory with the blackboard.
Chapter 4: 3 paint colors and the ant nest
- Accept the town painter's request. As Dion, dash along the inside route in the spider race and take the Red Paint without hitting the wall.
- Take the Green Paint through Max's penalty kicks and Blue Paint through Jack's jumping contest. Return to the middle while jumping; do not chase distant stones so far that you miss the next falling one.
- Read the color book in the records room and turn off the fan with the castle switch. Go behind the throne and examine the king's Gown, then cooperate at the painter's place to apply blue -> red -> green.
- In Polly's room, speak to Salmo and examine the portrait and letter on the desk. Once the nest is accessible, descend the hole and pick up Soldier Blue.
- Help the fallen soldier with Soldier Blue before helping Hazan. Hazan uses all that remains, so do not leave the soldier until afterward.
Chapter 4: queen ant and the fourth orb
- Dig with Mogura-kun in the hollow where the soldier lay. Use another boy to distract the clockwork robot, then target its back as Dion during the opening after it swings the iron ball down.
- Push the stopped robot sideways into the hole with all 3 boys. Rescue Hazan and receive the Buster Cannon. Descend farther through the hole beneath the upper rock.
- Flying ants send you back if they catch you, so stop them first with Jack's Spray. Stop the next robot by targeting its back too, then move it out of the passage.
- When the queen ant comes low, Search it and use the Buster Cannon. Distinguish reversed field-movement inputs from aiming controls and take your time. If you miss, reload before firing again.
- Return to the castle and examine the crystal in the back garden. Paint it red -> green -> blue to imitate an eagle egg. This differs from the painter's picture order.
- Once your size is restored, take the egg outside and give it to the eagle outside the cave in exchange for the crystal. Check the ship's boiler and sail.
Chapter 5, entrance: Permit and 3 colored chests
- Speak to Jim and Mr. Arnold in the tent, then visit the navy colonel in another tent. Return to the teacher for the Permit and show it to the sailor outside the minecart cave.
- Place crystals on the deepest pedestal from 3 directions to open the door. Have all 3 boys press the elevator switches simultaneously too.
- After examining the red door, explore another route using ladders and elevators. Open the colored chests in order to upgrade your keys from 1 -> 2 -> 3 -> 4.
- Control the robot on 3F with Jack's Controller to reveal the invisible floor, then follow it. Compare the visible footholds with your feet and do not rush to the edges. Take Blue Key 1 from the blue chest.
Chapter 5: Red 1, Green 1-2 and Red 2-3
- Leave to the left of where you obtained Blue 1, descend the quicksand and enter the right-hand entrance for the stairs. Head for the room with the generator and minecart.
- Put Max and Jack in the minecart while Dion generates power. Kick the chest and switch as Max, then cross the gap and lower the fence as Jack to reach Red Key 1.
- Take the elevator farther inside upward, leave outside via the stairs and take Green Key 1 along the route. Descend the quicksand before the chest and take the right-hand entrance to the large floor-panel room.
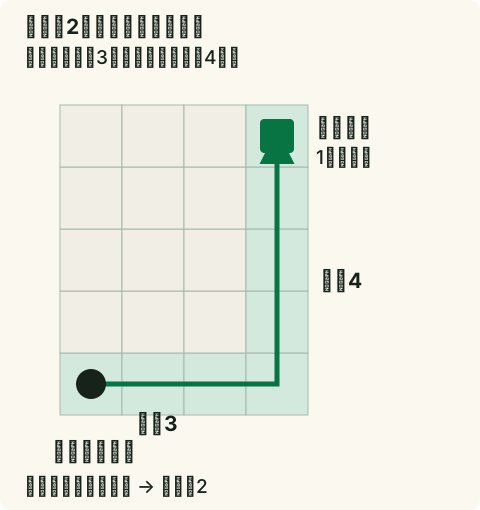
- From the lower-left edge, stand on the panel 3 squares right and 4 up. Leave a boy other than Max there to keep the door open, then send only Max to take Green Key 2.
- Take the elevator left of the panel room back to 3F and collect Red Key 2 from the red chest beyond the invisible floor. Enter the left-hand entrance below the quicksand.
- Use Dion in the race for Red Key 3. Run along the inside and press up-right at the corner before the finish to avoid hitting the wall.
Chapter 5: Blue 2-3, Red 4 and Green 3-4
- Take the elevator beyond the generator room toward the rope-crossing route. Hit the left wall and fall, then take Blue Key 2 from the blue chest. Choose the route that lets Jack reach the chest.
- Drop down again from the invisible floor on 3F to the 15-puzzle room. Equip Dion with the Dash Shoes; press B between panels to shift a panel backward relative to his facing direction.
- Use the empty square to complete the picture, then take Blue Key 3 from the chest beyond the opened route. Check the current picture orientation and empty square before trying a fixed input sequence.
- Head to 2F from beyond the generator room and push against the robot as Max alone. Keep pushing the middle of the rock, correcting your position if you slide left or right. The chest ahead contains Red Key 4.
- Take Green Key 3 at the far left of the same route, then take Green Key 4 near where the elevator reaches 4F. Returning to a matching door before obtaining Green 4 will not open the final door.
- To rescue the Patchies, go to the green door on 3F. Open the red door on 7F with Red 4, then take Blue Key 4 from the blue chest after meeting the teacher.
Chapter 5: final shared tasks and balloon
- Use Blue 4 on the first blue door and activate the elevator. You must leave 1 boy behind; choose Dion, who can catch up by dashing.
- Switch to Dion left behind with the Transceiver and dash to the others. Once everyone is in the balloon building, read the Note.
- For the Bellows, place Max on the left and Dion and Jack on the right, then cooperate to operate them. Before boarding the balloon, check the Luck Rocks in the building's corners too.
- During the balloon event, press A repeatedly in time with the on-screen signals. The remaining display is an in-game count, so prioritize the escape inputs rather than converting it into real-time seconds.

Surugaya Retro Games
Find used games, consoles and strategy guides in one place
Find Marvelous: Mou Hitotsu no Takarajima on Surugaya
Used games, strategy guides and related goods
Find used copies of Marvelous: Mou Hitotsu no Takarajima
Used items on Amazon
Marvelous: Mou Hitotsu no Takarajima strategy guides and guidebooks
Search strategy guides on Rakuten Books
Find Marvelous: Mou Hitotsu no Takarajima on Rakuten
Used items and related goods on Rakuten Marketplace
This section contains advertising and affiliate links. Purchases through Amazon Associates, Rakuten, Surugaya and other linked retailers may earn us a commission.

Corsair HS65 Wireless

Samsung Odyssey G4

Basilisk V3 X HyperSpeed

Corsair K70 RGB PRO
Affiliate links to Amazon Japan. Purchases may earn us a commission at no extra cost to you. Check the retailer for current prices.
eShop ¥5000 — Rakuten
ELECOM controller
Switch OLED — Splatoon 3
Roguelike Design Theory
Affiliate links to Rakuten Japan. Listed prices are indicative; check the retailer for current prices.