ActRaiser(Super Famicom)
Town Building, 24 Lairs, Population, and Levels
Check culture, lair sealing, regional items, and population-based HP/SP growth. Spell MP must be increased separately.
Scope: Japanese Super Famicom original (1990; separate from Renaissance) / Content checked: October 2, 2026
Town Development Order
- Remove obstacles with miracles and set the town's direction to build toward lairs. While the hourglass advances, control the angel to defeat monsters and protect homes and people.
- Reset directions if a road stops. Build enough population before directing roads to lairs. Sources differ between eight and ten people for sealing, so try with at least ten.
- Sealing particular lairs raises culture. Not every old home rebuilds automatically, so destroy low-culture houses with lightning and wait for new construction.
- Sealing every lair opens ACT 2. In regions with items to receive first, such as Northwall's Light magic, collect them before sealing.
- Defeat monsters if SP is low. Sealing lairs and leveling up also restore it, so when rebuilding after sealing all lairs, use restoration in other regions, too.
| Culture level | Population per house |
|---|---|
| 1 | 4 |
| 2 | 6 |
| 3 | 8 |
Fillmore Lairs and Pickups
Coordinates use the region map's upper-left as (0,0), X right and Y down. Monster counts are lair base values and vary with ACT 1 score or harm to residents, so check the actual display, too.
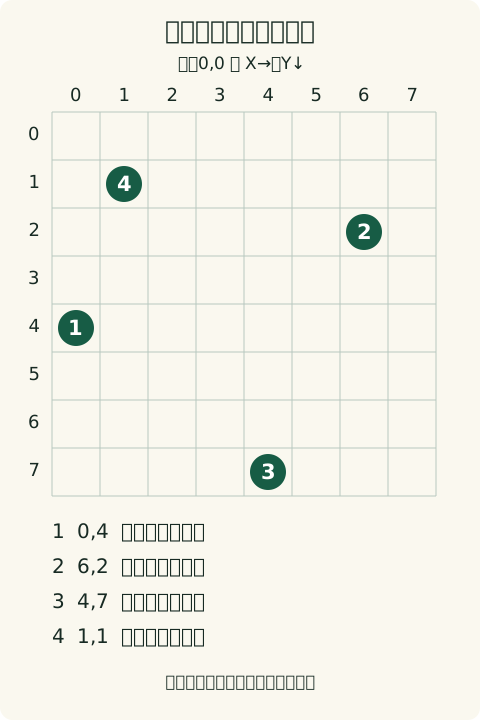
| Coordinates X,Y | Monster | Base count | After sealing |
|---|---|---|---|
| 0,4 | Blue Dragon | 250 | Culture |
| 6,2 | Napperbad | 125 | Culture |
| 4,7 | Napperbad | 125 | Angel's Power |
| 1,1 | Napperbad | 100 | Shining Orb |
- Using the compass in Fillmore gives a Source of Life; in Marahna, a Source of Magic. There is only one, so decide where to use it first.
Bloodpool Lairs and Pickups
Coordinates use the region map's upper-left as (0,0), X right and Y down. Monster counts are lair base values and vary with ACT 1 score or harm to residents, so check the actual display, too.
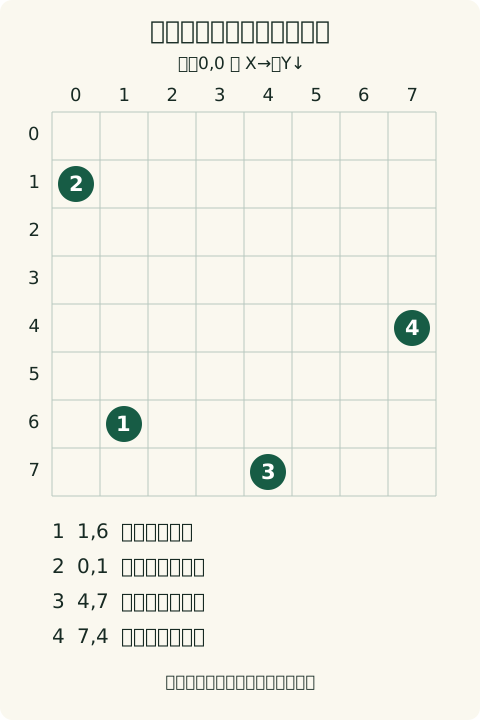
| Coordinates X,Y | Monster | Base count | After sealing |
|---|---|---|---|
| 1,6 | Red Devil | 150 | Seal with Skull of Destruction. Stardust magic |
| 0,1 | Napperbad | 50 | Culture |
| 4,7 | Blue Dragon | 100 | Shining Orb |
| 7,4 | Blue Dragon | 100 | Culture |
- Connecting the road before rice farming begins may fail to spread it. Connect after rice farming starts.
Kasandora Lairs and Pickups
Coordinates use the region map's upper-left as (0,0), X right and Y down. Monster counts are lair base values and vary with ACT 1 score or harm to residents, so check the actual display, too.
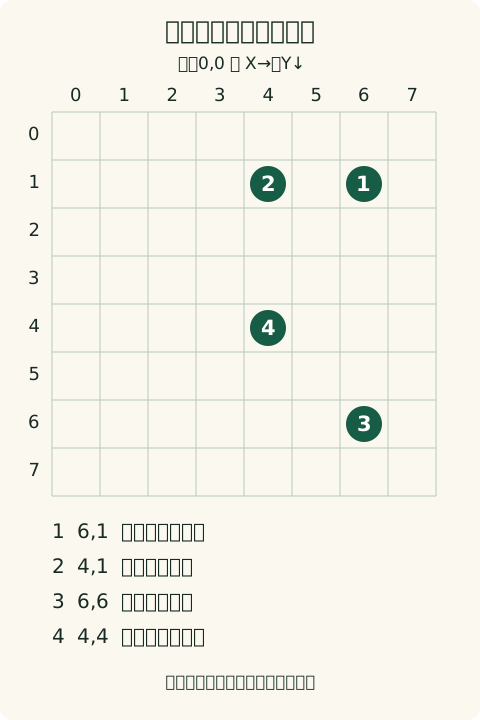
| Coordinates X,Y | Monster | Base count | After sealing |
|---|---|---|---|
| 6,1 | Blue Dragon | 220 | Shining Orb |
| 4,1 | Red Devil | 250 | Culture |
| 6,6 | Red Devil | 250 | Culture |
| 4,4 | Napperbad | 180 | Angel's Power |
- Prioritize the pyramid's Source of Life before ACT 2. Miracles alone do not cure the plague.
Aitos Lairs and Pickups
Coordinates use the region map's upper-left as (0,0), X right and Y down. Monster counts are lair base values and vary with ACT 1 score or harm to residents, so check the actual display, too.
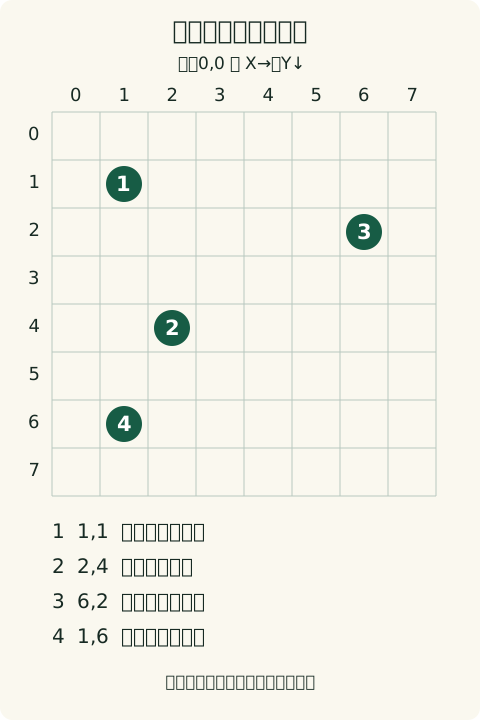
| Coordinates X,Y | Monster | Base count | After sealing |
|---|---|---|---|
| 1,1 | Blue Dragon | 170 | Culture |
| 2,4 | Skull Head | 90 | Shining Orb |
| 6,2 | Blue Dragon | 170 | Angel's Power |
| 1,6 | Blue Dragon | 170 | Culture |
- Sources differ on the timing of mountaineering technology and the Source of Magic. Check discovery messages and the offerings list.
Marahna Lairs and Pickups
Coordinates use the region map's upper-left as (0,0), X right and Y down. Monster counts are lair base values and vary with ACT 1 score or harm to residents, so check the actual display, too.
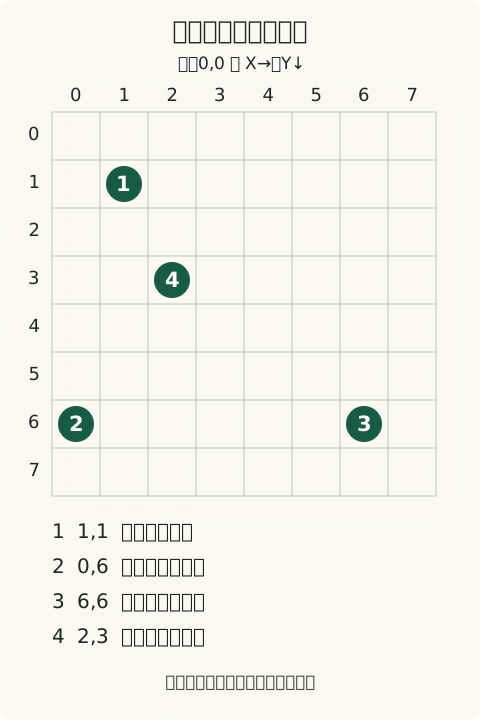
| Coordinates X,Y | Monster | Base count | After sealing |
|---|---|---|---|
| 1,1 | Red Devil | 200 | Culture |
| 0,6 | Napperbad | 130 | Culture |
| 6,6 | Blue Dragon | 200 | Shining Orb |
| 2,3 | Blue Dragon | 70 | Angel's Power |
- Sources differ on the population for Herbs: about 120 versus over 160. Develop the town and check discovery rather than treating one number alone as the condition.
Northwall Lairs and Pickups
Coordinates use the region map's upper-left as (0,0), X right and Y down. Monster counts are lair base values and vary with ACT 1 score or harm to residents, so check the actual display, too.
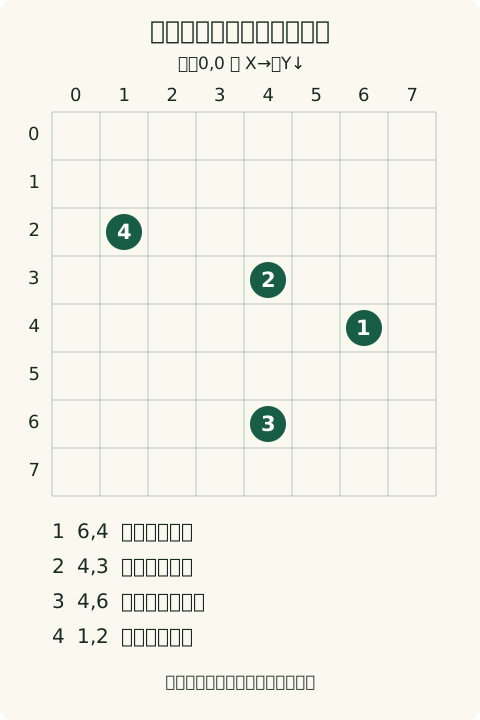
| Coordinates X,Y | Monster | Base count | After sealing |
|---|---|---|---|
| 6,4 | Skull Head | 150 | Culture |
| 4,3 | Skull Head | 100 | Angel's Power |
| 4,6 | Blue Dragon | 150 | Culture |
| 1,2 | Red Devil | 100 | Shining Orb |
- Even after giving fleece, the cold event may leave development slow until ACT 2. Do not try to solve it only by waiting.
Total World Population and Levels
Population is the total across all regions, not just the current town. Reaching the required population raises the god's level and increases HP/SP.
| Level | Required total population | HP | SP | Additional population to next level |
|---|---|---|---|---|
| 1 | 0 | 8 | 20 | 80 |
| 2 | 80 | 9 | 45 | 120 |
| 3 | 200 | 10 | 60 | 200 |
| 4 | 400 | 11 | 80 | 150 |
| 5 | 550 | 12 | 100 | 100 |
| 6 | 650 | 13 | 120 | 100 |
| 7 | 750 | 14 | 140 | 300 |
| 8 | 1050 | 15 | 160 | 350 |
| 9 | 1400 | 16 | 180 | 200 |
| 10 | 1600 | 17 | 200 | 200 |
| 11 | 1800 | 18 | 220 | 100 |
| 12 | 1900 | 19 | 240 | 100 |
| 13 | 2000 | 20 | 260 | 200 |
| 14 | 2200 | 21 | 280 | 200 |
| 15 | 2400 | 22 | 300 | 200 |
| 16 | 2600 | 23 | 320 | 400 |
| 17 | 3000 | 24 | 340 | Maximum level |
Reference Population Caps
The table gives maximum-population estimates agreed on by both sources. Road layout and updating old buildings are necessary, so ordinary progression will not automatically reach these totals.
| Region | Population | Review when targeting the cap |
|---|---|---|
| Fillmore | 634 | Update rice farming and house culture. |
| Bloodpool | 554 | Dry swamps and increase rice fields and homes. |
| Kasandora | 754 | Green the desert with rain to extend roads. |
| Aitos | 522 | Run windmills and rebuild higher-culture homes. |
| Marahna | 354 | Connect islands and reset roads in narrow spaces. |
| Northwall | 538 | Melt snow and check lakes and homes. |
| Total | 3356 | Combined population of every region. Review each town before targeting the cap. |
- Destroy low-culture homes with lightning and wait for homes matching current culture.
- In Marahna, reset narrow-road branches to increase habitable tiles. Review road layout when targeting the population limit.