Island progression, mission selection and final-island preparation
Choose islands with the Threat Scanner and review four missions plus the HQ battle, Perfect Island rewards and Reputation spending. Explains the differences between two-, three- and four-island victories and what to prepare for the final island.
Scope: PC Advanced Edition (additional content ON; mechanics based on the official 1.2.88 update announcement) / Content checked: October 2, 2026
Progressing through a corporate island
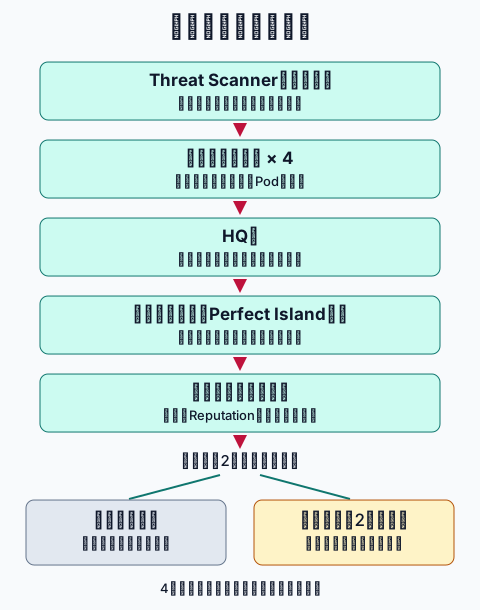
An original diagram of the choice sequence. Individual mission layouts and rewards change between runs. Enlarge diagram ↗
Before choosing an island, inspect its regular enemies, Psion and boss in the Threat Scanner. Initially avoid enemies your squad struggles to stop.
Read the terrain and objectives of available missions and choose a reachable route. Consider how escort targets interact with your attack areas as well as the number of stars.
Complete four regular missions, then the HQ battle. Leaving an encountered Time Pod unprotected affects the Perfect Island conditions.
At HQ, read the displayed objectives, such as killing the boss and protecting corporate buildings. Surviving alone may not earn every reward.
Choose your reward and spend your Reputation at the island shop before continuing to the next island.
Whether enemies can be dropped into water and whether area attacks will hit the train.
R.S.T.
Desert, smoke from sand tiles, Terraformer and more
Whether smoke will stop your own actions and whether you can use terrain support.
Pinnacle
Ice, freezing, robots and more
Use the objectives to distinguish targets to kill from targets to protect. Check what will act after thawing.
Detritus
A.C.I.D., disposal equipment and more
Damage after A.C.I.D. is applied, and escape routes for your mechs and mission units.
An island's name alone does not determine difficulty. Enemy combinations and mission layouts vary even on the same island, so check both the Threat Scanner and the board.
Can you handle enemies without hitting the target with area, piercing or chain attacks?
Do not mistake building protection upgrades for protection of ordinary units.
Kill count
Can a squad focused on freezing or smoke still kill the required number?
Do not add frozen enemies to the kill count.
Block Vek spawns
Rocks, bombs, movement and mech HP after blocking
Moving far away to block a spawn can leave other buildings undefended.
Limit damage to mechs
Self-damaging weapons, fire and spawn-blocking damage
Read the objective to see when the mission or achievement counts damage.
Protect a particular Vek
Can you stop it without killing it, using pushes, smoke or freezing?
Killing it by including it in an allied area attack or electrical chain.
Defense/robotics lab
Core rewards and ways to reach defensive positions
Choosing only for the reward can leave you unable to reach the unit you must support.
Dam or terrain destruction
Whether moving enemies into water works, and the positions of your mechs and buildings
Flying enemies remain above water. Instant-death terrain can catch your own mech too.
Environmental attacks and support devices
Display their area and action order before using them
Assuming an enemy attacks before the environment kills it, or the reverse.
Even a high-reward mission delays upgrades if you fail its objectives. Rather than choosing an escort mission your first-island tools cannot handle, consider a route that succeeds and earns Perfect Island.
Do not fail any displayed objective on the island. Protect any Time Pod that drops along the way too.
No building damage and Perfect Island are separate conditions. If objectives remain intact, ordinary grid power loss does not immediately invalidate Perfect Island.
Compare the pilot, equipment and grid power rewards. Choose for your current shortage, such as a locked pilot, a missing tactical tool or low grid power.
Decide which mech will use an item before buying it. Read equipment class, required power and uses, and inspect its area in Test Mech.
When spending cores on damage, check whether the upgrade crosses the next enemy HP threshold. Even a small increase frees an action if one mech can now kill a target alone.
If movement or building protection opens new solutions, do not concentrate all power on damage.
Unspent Reputation cannot be carried to the next island. Check purchases or recovery options for any remainder before leaving.
Option
Cost and role
When to buy
Reactor Core
Normally 3 Reputation. Provides power for mech and equipment upgrades
When existing weapons cannot finish enemies, or when it enables a needed range or protection upgrade.
Weapons and equipment
AE increased weapon purchase costs by 1 Reputation from the older 1.2 version
Add answers to unreachable positions or enemies you cannot push, rather than more attacks in the same direction.
Grid Power
Replenish low grid power
Add a survival buffer before the next island or final island.
Sell unwanted items
Convert them to Reputation at the displayed sale value
Check whether spare equipment or pilots are truly unnecessary, or whether a pilot is a carryover candidate.
Do not apply old articles' claims such as every weapon costing 1 Reputation, squad coin prices or shop stock counts directly to AE.
Does your current equipment provide the attack prevention and reach needed for the final battle?
Restore grid power at the shop and equip each mech with something it can actually use.
Three islands
Will another island's rewards enable a clearly useful upgrade?
Check whether you can handle increased enemy HP and additional enemy types.
Four islands
Are you pursuing squad achievements or a four-island victory record?
Keep mechs and pilots alive while upgrading and moving to the next island.
A shorter victory is not always easier, nor is a longer one always better. Compare the squad and equipment you have when deciding to enter the final island.
Before departure for the final island and during battle
Restore grid power and check every mech's weapons, required power and uses. Test equipment in Test Mech even if you did not use it on the previous island.
Prepare answers to enemies you cannot push because of nearby buildings, distant enemies and multiple threats. Avoid giving every mech only the same attack direction.
The final battle has separate stages. Protect grid power, mechs and pilots, and save tools needed in the second half.
In the second half, watch attacks on both the bomb and power facilities. Check displayed turns remaining, terrain events and attack order before acting.
This section does not provide fixed enemy layouts or a solution for every turn. Exceptions after the bomb is destroyed and complete boss values are withheld pending further cross-checking.
Check AE additions and Unfair separately. Using an added squad does not automatically set the difficulty to Unfair.
On boards where some loss is unavoidable, compare the consequences of the grid running out, losing an important pilot and failing an objective.
The official announcement says Unfair increases grid power gains and caps enemy spawns. Leaving a weak enemy alive can be an option, but do not ignore its current attack on a building.
Unfair is not presented as the default for a first run. Choose it after understanding squad controls and normal defensive play.