
Affiliate links to Amazon Japan. Purchases may earn us a commission at no extra cost to you. Check the retailer for current prices.
Shogun Showdown / Shogun Showdown
Basics, Day progression, and fixing sticking points
Even one move is a turn in which enemies act. Learn queuing before attacks, the Quick and Immovable exceptions, and the difference between normal waves and boss summons; then choose your next reward according to why you lost.
Scope: PC full release, version 1.0 series (sources compared through official patch 1.0.2.1). Excludes Prologue, old Alpha versions and mods. Behavior has not been verified through gameplay or video, and individual console patch numbers remain unconfirmed. / Content checked: October 2, 2026
What advances in one turn
| Action | Normal progression | What to check |
|---|---|---|
| Move one space | Your position changes, and enemies act too | Your destination and enemy ranges after moving |
| Turn around | Your facing changes, and enemies normally act too | Whether you need a forward- or backward-facing attack tile |
| Queue a tile | The tile enters your queue, and enemies act too | Whether you have time to queue another tile |
| Execute the queue | Attacks and movement happen in the queued order, and enemies act too | Whether the remaining ranges still align after movement partway through |
| Wait | Advance time without changing position | Whether an enemy attack will arrive while you wait for a cooldown |
| A Freeplay tile | Queuing it can avoid consuming a turn | Distinguish execution itself from the tile's property when queued |
- Special abilities and skills add exceptions. Enemies do not always follow the same prepare-then-attack sequence either; Quick enemies prepare and execute faster.
Use the Wanderer's swap to leave Spear's direction
The following illustrative board has a normal spearman in front, facing left and preparing an attack. Swapping positions without changing the enemy's facing takes you out of its forward area.
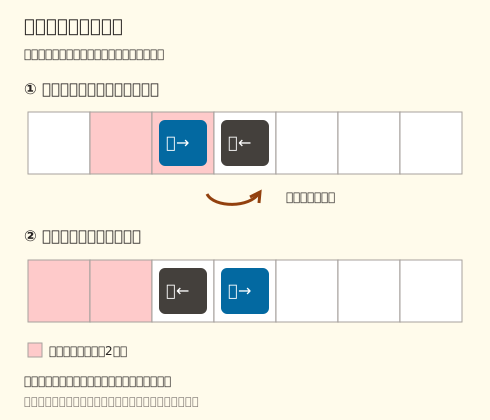
- Read the enemy's queued tile and facing. In this example, the two spaces to the enemy's left are dangerous.
- With your ability ready, move forward toward the enemy in front and swap positions.
- You move to the enemy's right, but also check whether another enemy's Arrow or Charge can reach that position.
Check fast and immovable enemies first
| Trait or opponent | Difference from normal | How your response changes |
|---|---|---|
| Quick | Less time between preparing and executing an attack | Do not plan to stack two escape tiles after its preparation tile appears |
| Immovable | Cannot be pushed or swapped | Smoke Bomb's attack also fails. Bring another attack or normal movement option |
| Spearman | Reaches the two spaces ahead | One step back may still leave you in range |
| Spiked charger | Closes the distance with a charge even from far away | After defeating the front line, handle the back line with the same attack queue |
| Warden | An explosion occurs where it falls | After a swap or throw, check where it will die |
| Shinobi | Uses ranged attacks quickly | Keep other enemies as shields while retaining an attack for the back line |
Days 1–7: difficulty and goals
| Day | Confirmed changes and goals | Next preparation |
|---|---|---|
| 1 | Aim for your first Shogun victory | Learn the hero's position control and the prepare-then-execute order |
| 2 | Elite enemies appear. This has changed from the Day 3 listing in older updates | Read trait icons as well as visual enemy types |
| 3 | Fewer consumables are available | Avoid hits and do not sell off all your healing |
| 4 | Corrupted bosses enter the candidate pool | Do not assume you have the same action window as against normal versions |
| 5 | Base maximum HP becomes 5, before skill increases or decreases | Recalculate the cost of skills that sacrifice maximum HP |
| 6 | Raise the difficulty and challenge the Shogun again | All Day-specific additions are still being checked. Prioritize the departure screen's description and enemy warnings |
| 7 | A final battle follows the Shogun's second form | Save shields, healing, and your main ground-phase attacks until the end |
- Progress each hero's Days separately. Switching heroes does not necessarily mean the same Day or stamp is already complete.
Choose a region according to what your tiles lack
| Point in the route | Candidates and opponents | What to consider from your tiles |
|---|---|---|
| Departure | Bamboo Forest: Daisuke / Rei after unlocking | Plan how to evade Charge even with only standard starting tiles and the unique ability |
| After Bamboo Forest | Iwao in the caves / Baru at the Battlefield | Compare evading a two-space forward attack with reaching behind a barricade |
| Early convergence | Moonlit Port: The Twins | Save an ability that avoids being surrounded, along with ranged attacks |
| Midgame branch | Gate to the Netherworld: The Statue / Unmarked Graves: Fumiko | Check whether you can damage an Immovable foe without position control, or dodge a fast approach by swapping |
| From midgame onward | Hot Springs: Kowa / Noh Stage: Sato | Consider repeated attacks to break shields, or saving main tiles for act changes |
| Before the Shogun | Hideyoshi / Nobunaga / Ieyasu | Choose according to whether you can handle movement within multiple tiles, lit spaces, or teleporters |
| Final area | Shogun's Castle | Check cooldown management against a lone boss as well as your build for the journey |
- Public sources differed between connection tables and recommended routes. No unconfirmed branch lines are drawn on a map; check the in-game map for candidates you can actually select.
Choose the next reward from the situation in which you lost
| Cause of defeat | Role to improve | Example to check |
|---|---|---|
| Could not reach the back line | Ranged tiles or tiles that target farther back | Defeat the front line before using Arrow / target the farthest enemy with Lightning |
| Surrounded, so the ability failed | An attack that opens a space, or another movement option | Leave a space beyond the Shadow's target or in front of the Jujitsuka |
| Defenseless after using the main tile | An escape tile's cooldown or a second attack | Do not spend Smoke Bomb solely for damage |
| Hit despite defeating an enemy | Death effects and position changes | Check where the Warden died |
| Unable to land damage on a boss | Range against a lone target and enemy traits | Lure Nobunaga into the light / do not use swaps against Immovable |
Separate mon from skulls, and runs from permanent unlocks
- Spend a run's mon on that build's tile upgrades and skills. Treat skulls as an unlock resource retained for later attempts, and check the camp's tiles and skills.
- Unlocked tiles join the reward pool. This does not mean you are guaranteed to obtain them in the next run, so also learn situations you can handle with starting tiles alone.
- Additional shop slots also have permanent unlocks. If a shop offers few skills of the type you want, check its locked entries.
- Unlocking every tile and skill is required for Ultimate Arsenal. All unlock costs are still being checked by version; prioritize the cost displayed on the locked candidate.
- In the full release's Moonlit Port, a skull service becomes a candidate after everything is unlocked. Do not plan to use it for currency exchanges before finishing permanent tile and skill unlocks.
Check endings and controls after progressing
- The full release adds ending sequences for clearing Days after completing the first Day. On Day 7, confirm completion only after finishing the final battle.
- To watch a completed sequence again, open Endings from Other in the menu. Check the list's current display for unlock conditions of content you have not reached.
- If the controls do not suit you, review your key bindings. Assign normal movement, turning, the special ability, and queue execution as distinct actions.
- If you are unsure during a stage, return to enemy warnings and tile descriptions. Try achievements and randomized starting builds as separate goals after becoming comfortable with normal clears.
- Hidden commands and additional heroes are omitted when they cannot be confirmed in official material for the full release.