Alundra (PlayStation)
Missables, candle stands, the Snow King and Gilded Falcons
Items in completed dreams or destroyed houses cannot be collected later. Check major deadlines, the charm's lighting order, Snow King requirements and minigame admission.
Go to additional collection locations (open answers) ↓
Scope: Japanese PlayStation version (released April 11, 1997; additional materials checked October 14, 2026. No hands-on retest performed.) / Content checked: October 14, 2026
Eight dreams: collect before the final event
| Dream | Collectibles to check | Landmarks to search | When to check |
|---|---|---|---|
| Wines | Gilded Falcon | Near the last lever | Before the Beanoid King battle |
| Olen | Gilded Falcon | After defeating the Muruta | The brief interval before being returned to reality |
| Bojes | Life Vessel and Gilded Falcon | Beyond the colored-block key; passage toward the boss | Before the Saati battle |
| Kline | Life Vessel and Gilded Falcon | Area below the cracked floor; back-right switch route | Before opening the final door with three keys |
| Gousel | Life Vessel and Gilded Falcon | Left branch beyond the crystal-carrying section and the drop route | Before the Demon's Gate battle |
| Mediaum | Life Vessel and Gilded Falcon | Side paths in the statue areas | Before finishing the final game |
| Eline | Life Vessel and Gilded Falcon | Early hidden path; ice world | Before proceeding to the deepest part of the final world |
| Twins | Life Vessel and Gilded Falcon | Beyond the red world's last door | Before the warp leading to the boss |
- This table checks major collectibles. It does not cover every chest or route through every room.
Seven early locations: order for recording Gilded Falcons
These seven locations are checks up to completing the first mine. They are not routes to all 50. Record dreams and houses that will be destroyed first; do not treat this as guaranteeing the same total at the same point every time.
- Immediately after receiving Bombs, check Olen's house chest first. Next, take the stump detour and explore the mine before moving to village events after returning.
- If you have a save from just before finishing a dream, keep it separately. Even if short of 50, do not keep searching an unreturnable dream as though it were a revisitable overworld location.
| Location | Landmarks and requirements | Avoiding missed pickups |
|---|---|---|
| Lookout | Outside the village, west from the swamp | Record as a regular overworld detour |
| Taras's Manor | Explore the manor while seeking the Book of Elna | Check the chests before leaving with only the book |
| Wines's dream | Left of the last lever | Collect before fighting the Beanoid King. Re-entry after completion is impossible. |
| Olen's dream | After defeating all Muruta | Collect before being returned to reality |
| Beyond the small stump southwest of the village | Blast the stump after obtaining Bombs | Distinguish this from the Power Glove detour involving large rocks |
| Olen's house | Chest at the back after he is taken to the chief's house | Collect before Bojes's event destroys the house |
| Mine | Side path while heading upper left from the large area | After handling keys and track switches, check before heading straight to the elevator |
Olen's house: before Bojes's event
- After the mine accident takes Olen to the chief's house, you can open the chest at the back of his own house. Collect its Gilded Falcon.
- The house is destroyed as Narsia's and Bojes's event advances. Collect after returning from the mine rather than leaving it until after Raa's trial.
Havan's Charm: six candle stands in order
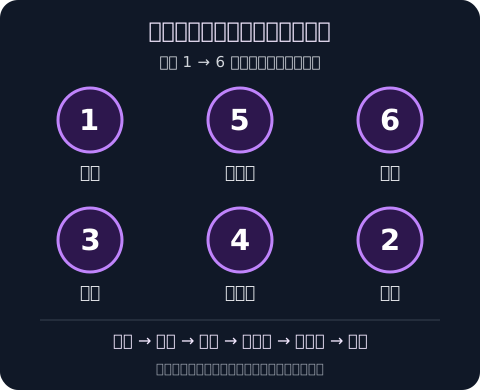
- Obtain the Fire Wand and enter the basement of the house east of the church. Check the two rows of three candle stands.
- Light them upper left → lower right → lower left → bottom center → top center → upper right. Take the charm from the chest that drops.
- Equip it against Nirude's face rocks and the volcano's flames. Do not treat it as universal equipment that nullifies water or every kind of attack.
Snow King's Sword: 20 restarts and the Power Glove
- Receive the Power Glove after exploring the church. Pass the large rocks and examine the Snow King's monument.
- The requirement is at least 20 restarts. Do not confuse this with the number of loads or the in-game play time.
- This sword cannot use charged attacks. Change equipment where another sword's charged attack is needed.
- You do not need to delete existing saves to obtain it. Do not overwrite your current progress solely for this requirement; retain saves where you checked missables.
Admission Ticket and the captain's exchange: check after Ofukuro
- When entry through Rutas's chimney becomes possible, take the Admission Ticket from the second-floor chest. It grants access to the back of Riverside Bar.
- Hear the captain's story in the bar to unlock exchanging Gilded Falcons for equipment at his shop.
- Three minigames are available: slime whacking, target shooting and roulette. Each requires clearing five stages consecutively; receive a Life Vessel for the first success and a Gilded Falcon for four successes.
- Roulette results cannot be guaranteed by a fixed input sequence. Personal trial records are not presented as a guaranteed winning pattern.
- The Admission Ticket comes from a temporarily accessible location. Get it before advancing the story; the minigames themselves can be attempted after later equipment upgrades.
Gates, well and healing: return points for revisiting
| Location | Unlock requirement | Available use |
|---|---|---|
| Gates around the world | Open the desert floodgate and finish Belu's trials | Shorten overworld travel |
| Inoa Village well | Open the warp at the back right of the Lake Shrine garden | Travel between shrine and village |
| Back left of the shrine garden | Handle the garden keys and floor switches | Recover HP and MP |
Fixed operations that were cross-checked
| Landmark | Operation | What to distinguish |
|---|---|---|
| Raa's tomb: four orbs | Right → left → down → up | The cardinal-direction room, not the separate vertically aligned orbs |
| Ancient Temple: stone-stacking room | From bottom: water → sun → moon → star | Orientation in the left/right holes is a separate mechanism |
| Nirude: engine | Left → right → left → left → right → right | Use the floor switches, not the room's levers |
| Ice Manor: left and right levers | Left room down; right room left | Not the ice-pillar movement sequence |
| Eline's fire world | Down → up → up | Levers on the yellow-crystal side |
Checks still needed for full collection
- Routes to all 50 Gilded Falcons, every Life Vessel location and complete weapon, armor and consumable statistics remain unfinished. Keep records of missables if your collection total is short.
- Sources differ on mine power inputs, Gousel's four-orb order, shops after Roein, the Admission Ticket's final availability and damage from the final form's hands. These remain unsettled.
- All ice-pillar operations in the Ice Manor and Kline's dream, Belu's five signs and the full connections in Havan's underground passage are still being checked.
View the 11 additional collection locations (answers: places and steps)
Gilded Falcons: additional cross-checks for 11 locations
Public materials were cross-checked against the Japanese PlayStation version. These 11 additions join the initial 7 locations for a total of 18. Individual checks for the other 32 of all 50 locations remain incomplete. No hands-on console retest was performed; this does not guarantee later re-entry or shortest input sequences.
| Location | When to check collection | Required progression or tools |
|---|---|---|
| Raa's tomb: the room where you drop below the goddess statue | During the crypt walkthrough; check before leaving | Able to reach the goddess statue using levers, a lift and a barrel |
| Bojes's dream: beyond the late blue blocks after removing them | Before proceeding to the dream's boss battle | From the Bomb-revealed warp destination, proceed to the color-switching area |
| Above the mine: a house reached through a cave, roof and chimney | Overworld exploration after obtaining the Chain Throw | Bombs and Chain Throw |
| Mine exit: from the high southern platforms to the riverside chest | After completing the mine rescue and returning to the surface through its exit | Able to reach the overworld on the mine-exit side |
| East of Taras's Manor: riverbank north from the bridge | When the bridge and riverbank east of Taras's Manor can be explored | A land route allowing travel north along the river's east bank |
| Central desert: the recess in the right-hand pyramid-shaped rock | While crossing the central desert toward the Sand Cape | Progression allows access to the central desert rocks |
| Northern desert: from the pillar, follow the northern high ground east | After obtaining the Long Boots | Increased jumping reach from the Long Boots |
| Central swamp: chest on the small island | Overworld exploration after obtaining the Long Boots | Increased jumping reach from the Long Boots |
| Coastal Cave: lever hidden behind a rock in the wooden-bridge room | After obtaining the Merman Boots inside the cave, before proceeding toward the boss | Chain Throw, Merman Boots and progression through the cave |
| West of the mountain path: high chest left of the wooden statue | After obtaining the Chain Throw, when a detour to the eastern mountain entrance is possible | Must have obtained the Chain Throw |
| Ancient Temple: beside the third goddess statue, below the lift | After examining the second goddess statue in the Ancient Temple, while progressing through the rooms beyond | Able to use the Sand Cape and Bombs to reach the temple's later rooms |
Raa's tomb: the room where you drop below the goddess statue
Timing: During the crypt walkthrough; check before leaving. Requirements: Able to reach the goddess statue using levers, a lift and a barrel.
- From the area where you leave the central lever unchanged and operate the side levers, enter the left door. Look for the room where the lift can carry a barrel.
- Use the barrel as a step to examine the goddess statue. Do not leave after examining only the statue: descend through the broken floor into the lower area.
- Below, use rocks as platforms and jump to collect the Gilded Falcon in the room's corner.
- Clear the remaining enemies and return to the route ahead. Record this as one Gilded Falcon, without counting another chest as the same pickup twice.
English sources call this Lars' Crypt. The statue and landing-area positions were cross-checked, but this does not guarantee re-entry after completion.
Bojes's dream: beyond the late blue blocks after removing them
Timing: Before proceeding to the dream's boss battle. Requirements: From the Bomb-revealed warp destination, proceed to the color-switching area.
- After following Bojes to the outer area, pass the section where a Bomb reveals a warp. Check that you have reached the side with the key and Life Vessel.
- After revealing the blue blocks to collect the key and Life Vessel, toggle the statue to retract those blue blocks.
- Explore beyond the opened passage and collect the Gilded Falcon in the room where Bojes spoke with the dream woman. Do not confuse it with a chest in another dream or a village house.
- Record the pickup before resuming the pursuit and proceeding to the boss area. Do not plan to collect it after the dream ends.
English names are Bonaire's Dream and the boss Sara, corresponding to the Japanese Bojes/Saati. Avoid confusing this with Narsia; the story's ending is not explained here.
Above the mine: a house reached through a cave, roof and chimney
Timing: Overworld exploration after obtaining the Chain Throw. Requirements: Bombs and Chain Throw.
- Instead of re-entering the mine's front entrance, look for the cave in the cliff above it. Blast away entrance obstructions with Bombs.
- Avoid spiked balls inside and use the Chain Throw on the stone pillars to proceed. This is the section described as using a Flail in English sources.
- Defeat enemies to open the stairs, then clear the neighboring room's enemies on the upper floor too. Even if enemies seem to keep appearing, check whether the gate has opened at each stage.
- Cross from the cave exit to the house roof and descend the chimney into the back of the house. Do not turn back after checking only the front door at ground level.
- Collect the Gilded Falcon from the back chest, then use the nearby switch to open the door and return outside. Record it separately from the one inside the mine and the other location just after leaving the mine.
The house and Chain Throw requirement are also confirmed by a Japanese list of all 50 locations. The cave's detailed route depends on an overseas wiki and has not been tested hands-on; total enemy counts and respawn counts are not asserted.
Mine exit: from the high southern platforms to the riverside chest
Timing: After completing the mine rescue and returning to the surface through its exit. Requirements: Able to reach the overworld on the mine-exit side.
- After emerging, descend south past the small round rock. Check this separately from the collection room reached by minecart inside the mine.
- Jump from near the rock onto the higher ground to the east. Follow the raised platforms east to the riverside chest.
- Take the Gilded Falcon from the chest and record it. Collect from the land platforms without assuming a route swimming into the river.
Separate from the pickup inside the mine and the one in the house reached through the cave above it. Record this as the riverside overworld pickup.
East of Taras's Manor: riverbank north from the bridge
Timing: When the bridge and riverbank east of Taras's Manor can be explored. Requirements: A land route allowing travel north along the river's east bank.
- Use the bridge east of Taras's Manor as your landmark and follow the river's east bank north.
- Look for the chest on the bank opposite the watermill. Before crossing the bridge into the mill, check the land on the opposite bank.
- Collect the riverside chest's Gilded Falcon. Record it separately from the other collection location inside the watermill.
A different chest from the one inside the watermill. Check the land route using the bridge and the river's east bank as landmarks.
Central desert: the recess in the right-hand pyramid-shaped rock
Timing: While crossing the central desert toward the Sand Cape. Requirements: Progression allows access to the central desert rocks.
- Find the pyramid-shaped rocks in the central desert and go around to the recess in the right-hand rock.
- Use the stone platforms in the recess to jump to the chest's height. Distinguish this from the chest on the high ground at the desert's northern edge.
- Open the chest and obtain the Gilded Falcon. After collecting it, return around the rocks and resume progression.
Separate from the northern desert high ground. Use the rock-recess platforms. No hands-on retest of the shortest jump count was performed.
Northern desert: from the pillar, follow the northern high ground east
Timing: After obtaining the Long Boots. Requirements: Increased jumping reach from the Long Boots.
- Head north through the desert and find the pillar and high ground on the upper side of the desert's second screen.
- Use the pillar as a platform to climb the northern high ground, then follow its edge east.
- Take the Gilded Falcon from the chest by the north wall. Record it separately from the one among the central desert rocks.
This assumes collection after obtaining the Long Boots. Check the chest on the high ground by the north wall.
Central swamp: chest on the small island
Timing: Overworld exploration after obtaining the Long Boots. Requirements: Increased jumping reach from the Long Boots.
- Find the small island in the swamp's center and the platform holding its chest. This is separate from the lookout west of the swamp.
- Use the jumping reach available after obtaining the Long Boots to cross to the island, then proceed to the chest's platform.
- Collect the island chest's Gilded Falcon, check the platforms on the side you came from and return.
Separate from the lookout pickup west of the swamp. This one is collected on the island in the swamp's center.
West of the mountain path: high chest left of the wooden statue
Timing: After obtaining the Chain Throw, when a detour to the eastern mountain entrance is possible. Requirements: Must have obtained the Chain Throw.
- Approach the mountain entrance from east of Ofukuro. Check this as a mountain-path pickup, separate from the chimney house above the mine.
- Follow the northern side of the mountain path to the second bridge, then descend toward the southern signpost. From the signpost, take the path back west.
- Open the chest on the high ground left of the wooden statue. Record receipt of the Gilded Falcon before returning to the mountain path.
This matches the Japanese description west from the mountain path with an independent source's elevated chest left of the wooden statue in eastern Inoa, using the on-screen statue/chest positions. The detailed route to the signpost summarizes public guide material, not a full set of hands-on inputs.
Ancient Temple: beside the third goddess statue, below the lift
Timing: After examining the second goddess statue in the Ancient Temple, while progressing through the rooms beyond. Requirements: Able to use the Sand Cape and Bombs to reach the temple's later rooms.
- Proceed beyond the second goddess statue, passing from the floor-eye room along the barrel-platform route. This is not a pickup at the temple entrance.
- In the room with a barrel dropping after all worms are defeated, use the barrel as a platform and activate the lever with a Bomb. Pass the opened gate before it closes.
- Continue through the next room, descend the lift and open the chest beside the third goddess statue.
- Record the Gilded Falcon pickup before examining the goddess statue and resuming temple exploration.
The Japanese list's desert temple refers to the same location as this article's Ancient Temple. The statue order and chest beside the lift were cross-checked against a Japanese play record and an independent guide. This review does not certify the gate's opening duration or shortest input sequences for every puzzle.

Surugaya Retro Games
Find used games, consoles and strategy guides in one place
Find Alundra on Surugaya
Used games, strategy guides and related goods
Find used copies of Alundra
Used items on Amazon
Alundra strategy guides and guidebooks
Search strategy guides on Rakuten Books
Find Alundra on Rakuten
Used items and related goods on Rakuten Marketplace
This section contains advertising and affiliate links. Purchases through Amazon Associates, Rakuten, Surugaya and other linked retailers may earn us a commission.

Game Design Brain

PSN ¥3,000

8BitDo Pro 2

PS5 Digital (Slim)
Affiliate links to Amazon Japan. Purchases may earn us a commission at no extra cost to you. Check the retailer for current prices.
Rakuten Points ¥3000
ELECOM controller
Game Design Bible
Balatro strategy guide
Affiliate links to Rakuten Japan. Listed prices are indicative; check the retailer for current prices.